Sunday, November 15, 2015

Icy lab, LOL charts and Quantitative problems

       One of the main ideas that our class learned this week was the relationship between ice, water and gas. In order to investigate these relationships, we conducted an Icy Hot Lab. For this lab, we filled a beaker with ice and placed the beaker on a hot plate. Once measuring the temperature (-13.1°C), using a thermometer that was connected to lap quest; we turned on the hot plate and began observing. To make sure the temperature was evenly distributed, we mixed the ice around in a constant motion. We continued mixing and observing the change in matter. After a few minutes we noticed water beginning appear at the bottom of beaker at -4.3°C. We began observing this reaction until the ice turned completely into water (15.4°C) and later reached it’s boiling point (98.5°C). It was up to our class to hypothesize the resulting graph. With the y-axis being temperature and the x-axis being time, my table group and I predicted to the graph to more a positive curved graph:  This means as the time increased, so did the temperature. After discussing the multiple options, we realized that that curved relationship couldn’t work because we wouldn’t be able differentiate the changes in matter. This was our resulting graph: With various whiteboard discussions, our class learned that this graph shows the energy flow through heating during its series of changes. Two main types of energy that play into these transfers are thermal and change phase energy (Eth and Eph). During the inclines of temperature, thermal energy(Eth) is stored. During the plateaus, there is a change in the phase which stores phase energy(Eph). The particles reactions for this graph are pretty simple to comprehend. Here is a diagram that shows the particles movement throughout the energy flow process: From previous labs, we know that colders particles move slower (ice) and warmer particles move faster. Once the process is over, it would have gone through 3 stages(ice>water>gas). Each stage has a different need of energy flow to change one matter to another. Which leads into the second main idea for the week. 
Different matters need different rates of energy applied to it, in order to explore more with this idea, our class did a few LOL charts (Energy flow bar charts). Here is example of one of the charts that my group and I worked through: 
To properly show the flow in energy, a solid is presented as one block, a liquid is two blocks and a gas is four blocks. As the description states, a can of cold soda warms as it is left on a counter. The current phase is a liquid, and is cold. Once sitting on the counter for awhile, the soda is still a liquid so the two blocks stay on the chart. On the other hand, the cold soda did warm up. This means the thermal energy has increased. To show this increase We sketched half a block on the final thermal column. This results in a .5 energy flow increase. Beginning with the energy flow of 3.5 and resulting in 4.0, this means an increase in energy has taken place. We can show this change by putting an arrow towards the circle with half a block stretched behind it. 
Our last main idea for the week was quantitative energy problems. This idea incorporates the objective learned in the icy hot lab. Due to the rate of how much energy is needed to alter various types of matter, there is an energy constant for each one. The purpose for these problems is to be able to calculate the energy used or needed within a reaction. Here is an example of one of the problems our class handelled.To find the energy that was released, we used the equation Q=m(mass) • c(capacity) • the change in T. Once plugging in the accurate data, we solve. We can solve by first cancelling out all units of °Celsius . Keeping in mind that energy is measured in Joules, the product in this case is -32,000 J. 
As we continued this week, we mainly focused on quantitative problems, LOL charts and the significance of the icy hot label. Overall, my head wasn’t in this week's lesson compared to previous weapons. Although I enjoyed the LOL charts and the Icy Hot Lab, I found the quantitative problems to be a bit of a challenge. I felt kind of confused during the lesson and was not too confident about my understanding. I’m interested in doing more LOL charts, yet challenge myself with more quantitative word problems. My comprehension of the quantitative labs would be about a 4, whereas my understanding of the LOL labs are about an 8. Overall, I look forward to applying these concepts in the future and experimenting with them more. 


Tuesday, November 3, 2015

PTVn Tables and Review

The main ideas for this past week were figuring out how to find the correct calculations for our previous known information, through PTVn lab tables. Branching off of the our previous weeks’ main focus (PTVn Labs), this past week we focused on studying the relationship between pressure, temperature and pressure.
In order to find the proper calculations (pressure, temperature, volume, numbers of particles), our class worked through two PTVn problem packets. When working through each problem with our table members, we were instructed to conduct whiteboard discussions for each word problem to ensure everyone comprehended the information. To thoroughly explain how I came to understand this week’s lesson, here is a picture: IMG_8965.JPG Here I am going to work through one of the problems that our class did in order to fully explain the lesson. In the table we have initial data, final data and the effect (positive or negative) slots to record our information. The word problem gives us the proper numbers that allow us to just plug the information into the table. IMG_8966.JPGOnce plugging in the provided information, I know that I do not have to calculate the temperature or number or particles for this problem so I simple cross those slots out. Keeping in mind that our goal for this problem is to find the final volume, we can solve this problem by making an equation. To make this equation, I thought of these numbers as ratios. It was easier for me to think of them as ratios, that way I could properly set up the fractions in the equation. For every 15.5mL, there is 14.7psi and we do not know the final volume but we know there is 10.9psi. To set this up it would be:15.5mL / x = 14.7psi / 10.9psi. Now, from our previous weeks lesson we know that as pressure decreases volume increases ( and vice versa). This means the largest number of pressure needs to go on top of the fraction because the largest number would cause the increase  in volume: FullSizeRender.jpgOnce solving this equation my calculator (95.5 x 14.7 / 10.9), the final volume results were 20. 9mL. From a lesson learned in previous weeks, I also know that our final answer must match in significant figures with the initial information. In this case, the significant figures match. We know this because the initial volume has 3 significant figures and due to our final volume having a zero that is “sandwiched”, also makes the number have 3 significant figures. After figuring out this information, we can thoroughly understand what is taking place in the word problem by drawing out a model: IMG_8970.JPG We know that the effect of the volume increased by not only the dependent of pressure, but the resulting answer of our equation. Knowing this information, we can conclude the final volume to be much larger than initial volume. Another piece of information that is important to know when drawing the model is the temperature and number of particles. We know that temperature and the number of particles were not affected. This means they were a constant variable and did not need to be altered in the model. To show this effect in the final and initial models, I drew the same amount of particles and same size arrows. We continued this lesson with various different scenarios and problems.

The second topic we focused on was studying for the unit 2 test. To prepare for this test we worked through the review guide and discussed the questions with our table groups.

My thoughts of this weeks were positive. I didn’t realize how much our previous lessons would be helpful for us until coming into this week's lesson. I also enjoyed how much we collaborated with our groups more. I liked being able to work through problems and write everything out on our whiteboards. Lastly, I found it helpful to work through some of the review guide in class with our classmates because we were able to thoroughly discuss each problem with one another. My overall comprehension of this week’s lesson from 1-10 would be a 9. I feel confident about having to solve the PTVn tables and would not mind doing them individually. My thoughts of the review guide are a little on the less confident side, but I think if I went through my journal I would be more confident for the test. Overall, I think my progress in the class is improving and I look forward for our next upcoming lessons.  

Sunday, October 25, 2015

Week 6: PTVn Labs & Particles in Motion


          Through the course of last week, we conducted various experiments testing the ideas of pressure versus temperature, number of particles, and volume, as well as the particles in motion of a liquid, solid and gas. To research the movement of particles we incorporated some of last week's experiments into this past week’s lessons. I think this past week has had to be one of my favorite weeks because I really enjoyed the type of hands on work that our groups had to do.

To begin last week, referring to an experiment conducted in previous weeks(hot and cold water with dye), we tested out the idea of how hot and cold molecules work through a liquid. When putting drops of the dye in the cold water, the dye was very resistant  in moving throughout the beaker of water. Contrary to the results of the cold water, hot water had more movement of the dye throughout the beaker. Going along with the results of the molecules in the solid, the heat from the water transferred to the dye which allowed the molecules in the dye to have more energy. Hence, more movement. The cold molecules slowed the molecules from the dye down once coming in contact with the water, which caused the dye to fall in one main direction. we focused on the movement of particles and went into depth of how the motion of particles work, being affected by temperature. Next, we worked on how this concept would affect a solid. After watching a video on how the motion of particles are affected, I learned that temperature is a proxy for the relative speed of molecules. The best way to explain this is by using the example shown to us in the video. If you take a balloon filled with air and set it outside of a hot summer day, the heat from the air transfer to the particles in the balloon. The molecules heat up and have a tons of energy. Similar to how if you give a child a bunch of candy, they begin “bouncing off the walls”, heat molecules act the same way. When they begin doing so, the increase in movement of the particles caused my the heat, forces the balloon to expand. On the other hand, cold temperature acts as the opposite. If you place a balloon filled with air outside on a cold winter night, the molecules move slowly. Cold molecules do not have nearly as much energy of hot molecules. The way the cold temperature affects the balloon can be best thought of as the way winter affects penguins. When it is cold, they waddle around very slowly and begin to huddle together to try to stay warm. These molecules act the same way. The molecules move closer together, causing the balloon to contract. Watching the video and having a class discussion about what we observed was our way of understanding the molecular motion in a solid. In continuation, of the lessons of this past week, we also focused on pressure and how it affects temperature, volume and number of particles.

In order to research or test these ideas, our class ran 3 labs. Our first lab was about pressure versus volume. In this lab we had a syringe hooked up to a pressure sensor. To begin, we filled the syringe with air up to 5 mL. After recording the pressure given to us by the pressure sensor, we continued tested pressures of volume. Once testing 5 different volumes, we also began graphing our information onto the computer. I found this part very interesting because we were able to learn how to graph information onto the computer. A major part of the relationship between pressure and volume was how the graph would look. Would the graph be linear, would the graph line be curved, or would the graphing line have a negative relationship, facing downward? These were all questions that our class had to answer. Each table group had a different hypothesis for the outcome of each lab. For the pressure versus volume lab, our table group thought the graph would have a negative relationship(still being linear). For the second test, we did pressure versus temperature. This experiment was a little bit more intense because we tested 3 different temperatures. To do so, we took a beaker filled with hot water, cold water (mixture of ice and alcohol), and room temperature water and put a smaller beaker into each one. The smaller beaker was hooked up to the pressure sensor which measured the pressure of each temperature. For example, IMG_9214.JPG in this picture, it shows hot water being measured for how much pressure it has. Again, these line of experiments were all recorded in computers and were graphed. my table group hypothesized our this graph to have a positive linear relationship. Lastly, we tested pressure versus the number of particles(puffs). For this lab we used the syringe again and adjusted the end the syringe to differentiate how many “puffs” had pressure, more or less.  The graphing for this lab was expected to replicate the pressure versus temperature results, to have a positive linear graph. In the end we were able to find out the real relationship of each subject being tested. Here are the correct results that my table group collected:  IMG_8866.JPG Here is the resulting graph of the pressure versus volume experiment. IMG_8869.JPG Here is the results our group got from the pressure versus temperature lab and lastly, here are our results for the pressure versus number of particles(puffs) lab:IMG_8867.JPG

My overall experience with the material for this past week, I’d say was positive. I really enjoyed the activities we did in order to understand the information given to us. From a scale of 1-10, my understand of the information would be an 8. My questions for this past week would just be what the difference is between a molecule and a particle. Other than that, I’d say I grasped the concepts pretty well and enjoyed to lesson taught to us.

Sunday, October 18, 2015

Unit Test & New Topic

   I found this week to be very interesting. On Tuesday we took a unit test.  I entered the test feeling pretty positive about my results and understanding on what we were being tested on. Although, I did have reservations because some ideas weren't really clarified. I wouldn't say it was expected but I was kind of in "awe" when I realized I had failed the test. I don't really know what to really think about it other then say do test corrections. I guess I had the wrong understanding of the information being taught throughout these past few weeks. This didn’t sit well with me so I definitely plan on fixing my mistakes. Nonetheless, I continued onto new experiments and lessons.

      After the unit test, on Thursday and Friday our class began experimenting on a new topic. We did an experiment with cold water, hot water and dye. First starting off with a beaker filled with cold water, drops of dye were placed into the water. My table group and I observed as the dye resignated in one general areas of the beaker and slowly fell to the bottom. We agreed that the dye mainly stayed the in the middle of the beakers. Afterward, we tested the beaker filled with hot water. We observed as the dye and the hot water mixed there was a more of a diffusion process. We explored the reasoning for how and why the actions took place during class white boards discussions. During the discussion, our class came to a conclusion for why these reactions happen. The hot water particles have more energy so they move around a lot faster. When the dye touched the hot dye is acted as the water and move around quickly. This differentiates from the cold water particles because they move much slower, so when the dye touched the water and moved slowly and stayed one area. IMG_0841.jpeg(cold on left, hot on right).

As a class, we observed a second experiment similar to our first one. This experiment was conducted by the teacher. He started off with a beaker of water filled with ice cubes. In this beaker, there was a tube of alcohol that was connected to a thinner tube which acted as a thermometer. The red liquid(alcohol) started off low. After class discussion, Dr. Finnan took out the ice cubes and turned on the hot plate which the beaker was sitting upon. With close observation, we found that as the water began to warm up, the alcohol began to rising. With deep discussion within the class, we found that this meant there was a heat transfer between that hot plate and the water, and the water and the alcohol.

      This week no one truly specified the topic for our next lesson but I think it could possibly involve: diffusion, osmosis, and heat transfer. I definitely look forward to finding out more information and purposes to these experiments in the upcoming week. For the unit test, I plan on doing test corrections and hopefully, correcting the information I wrongly thought about the tested topics.   

Sunday, October 11, 2015

Gas Density


This week, we took last week’s main focus of density and incorporated it into this week’s lesson. After learning that the formula for density is p=m/v, and testing the idea on matter and water, we learned how to graph this information. The mass is the dependent variable; this means the data goes along the y-axis. The volume is the independent variable; this means the data goes along the x-axis.  The slope of the graph is described as the density (change in y/change in x).

Once we learned this concept, we applied this idea to gas. We did this through doing a Gas Density lab. The objective of this lab was to extract gas from the chemical reaction of Alka-Seltzer and water and calculate the resulting density. The procedures we took for this lab were fairly simple and easy to follow. First we put 1-2 pieces of Alka-Seltzer in a cupcake tin and a bottle with filled some water and took the mass of both subjects. My table groups resulting mass (before) was 71.44g. After recording the mass, the top was placed onto the bottle and connected to a thin blue tube. This blue tube was connected to a larger bottle of water which was placed upside down in a large bin of water. Once everything as put into place, a table member of mines cautiously shook up the water to create a reaction with the Alka-Seltzer. I observed as the gas rose to the top and through the blue tube. When this happen, the water level in the larger bottle of water began to decrease. Once my group and I were sure the reaction had fully ceased, we unconnected the thin blue tube from the bottle mixed with water and Alka-Seltzer and weighed its remaining mass. The remaining mass was 71.27g. With this, we were able to calculate the mass of the gas which was –0.413g (71.44-71.27). Since the objective was to the find the density, we still have to calculate the volume. We took the rest of the liquid and poured it into a cylinder and found it was 338mL. Using the formula for density and significant figures, we calculated the density of gas to be 0.00121g/mL. This was interesting because we noticed that it was 600 times less dense than water.

This week we learned how to find the density of gas and the correct procedure toward doing so. I found it very interesting and a simple concept to understand. I think I have all of the concepts to a fair understanding but once doing a worksheet or taking a test, I seem be a little bit confused once receiving my results back. Personally, I think from 1-10, my understanding of this week's lesson is an 8 or 9. Hopefully, it will show in this upcoming unit test because I feel pretty confident about the main ideas.


Sunday, October 4, 2015

Mass Volume & Density


       During this week our class has been experimenting with the relationship of mass and volume, and the different measurements. The main idea of this week has been the relationship of mass and volume. To fully understand the property of mass and volume, our class conducted an experiment and worked through a pogil within their table groups.

       To start off with understanding the concept, we tested the idea of mass and how it affects matter in previous weeks. Later, the idea of volume then came into play. We tested the different volume measurements of water and recorded our information. Once filling a cubed container with water, my table and I measured the length, width and height. We then graphed our calculations into our journals. Knowing that volume is measured in cubic meters (cm^2) or mililiters (mL) and mass is measured in the unit of grams, we furthered our knowledge of these two ideas by carrying out an experiment. This was very interesting because we were able to combine these two ideas into one. We started off doing an experiment with measuring the mass of 5 pieces each of steel, acrylic and aluminum. After doing so, we measured the volume of all 15 pieces. The process of finding the volume was very interesting. For each element (5 pieces each), we carefully put it in a cylinder filled with water. When the water rose, we calculated the before and after measurements and recorded the difference in journals. This is where graping became apart of our research. We were able to use a graphing app on our laptops to our tables information of each element. I feel this process was informational because we were able to figure the property of relationship is density. Density is how packed an object is. For example, an water bottle half filled with water is more dense than an empty water bottle, yet a full water bottle is more dense then a half filled water bottle. This is because denser objects have less empty space in them.
     
       Our research on the subject wasn't over yet. We followed up the experiment with a pogil. Each table group worked through 3 problems and held white-board cessions for each problem. Each problem asked us to determine which figured had more mass, volume and density. I really enjoyed this part of the learning process because I, along with my other classmates were able to not only debate but understand each other views about the two ideas. One problem that kind of split the class in two was third problem in our pogil for this week. We discussed if figure E was more or less dense than figure F. I personally felt that figure E was more dense because density is the mass of a substance and how much space it takes up (which defined as volume). Hence, the relationship being density (p) = g/mL. This being the case, E would be the correct answer.

       I found this week to be very interactive and insightful. I enjoyed being able to collaborate with my table members to do experiments and work through certain roadblocks. I also enjoyed our white-board  table discussions as a class. Being able to learn from one another and ask questions, I feel it allowed us to be more responsible for how own learning. My concept of the main idea is pretty good. I'd say from 1-10, my understanding of the topic is a 10. Although being a ten, I wouldn't mind doing more practice and figure out a problem or doing a worksheet about the topic of density independently. Overall, I feel positive about how the week went and look forward toward what is to come.

Sunday, September 27, 2015

Significant Zeros and Histograms

       This week’s lessons have varied a little bit, content wise but I have definitely learned in the process. For the first couple of days, we continued on about the prior week’s review lesson. In doing so we recorded each table groups overall information through histogram graph. I found this way of collecting data interesting because I have never heard of it before. Basically, you make a box from one number to the next to show what a certain group got. If more than one group got the same number, you would put another box on top of the original one. To be more specific here is a photo. I think learning about histograms and how to use them will be very helpful for me in the future. 
      Pertaining to the main ideas of this week of Significant Zeros and Significant Digits in measurement, I definitely feel that the lecture really did educate me on knowing what sig figs (significant figures) are and how they are used. Significant figures are digits that are counted as significant. For example, the number 9.627, there are 4 sig figs. With learning sig figs, also comes learning about zeros. I learned that there are many types of zeros. There are zeros that are place holders, which come after a digit or exact number (e.g. 100, 140, 80, etc.). There are also zeros that come before a number, when dealing with a decimal (e.g. 0.02, 0.016, etc.), these are Significant Zeros. Following this idea, we learned that once a measurement is recorded, all obvious numbers are recorded and one estimated number, this is known as a Sig. Digit. Here is a picture to be clearer about the idea. Significant digits in measurement overall have 5 rules. 1. All non-zeros are significant e.g. 9, 12, 35643) 2. Sandwiched zeros (those that occur between two significant digits) are significant (e.g. 1.005 having 4 sig. Zeros, 34.01026 having 7 sig figs, etc.). 3. Zeros that are only place holders for a decimal are not significant (e.g. 0.005 having 1 sig fig, 0.0047 having only 2 sig figs, etc.). 4. Zeros at the end if a number that also contains a decimal are significant. These "trailing zeros" are only significant if the number contains a decimal point, for example: 4.500 has 4 sig figs and 3.0 has 2 sig figs. Lastly, rule 5. This rule is for exact numbers (without doubt or uncertainty, like 173). Here is a chart for a better understanding. When dealing with digits, I also came to an understanding that one digit can also have more than one rule. For example, the number 6040. This number is significant because it fits into the guidelines of rules 1, 2, 3 and 5. This number has zeros, there is an "in between-er" zero between 6 and 4, this is an exact number with no decimals or uncertainty.
       In order to grasp these various concepts, our class worked with their assigned group members to work through 2 pogils. One pogils worksheet was about significant zeros and measurement, and the other pogil was about Significant Zeros. We also listened to an informing lecture and had a class discussion and these main ideas.
       Overall I think I have understood the concept of sig figs, but I feel I do need more practice to fully be able to confidently give answers to questions about them. As far as my participation towards the subject goes, I feel that I have asked questions that have I needed answered and that has helped me. My overall understanding of the topic would be 8 out of 10. I'm definitely looking forward to exploring more on the topic and other lessons that are to come.


Sunday, September 20, 2015

Week Review 9-8/9-17


      Throughout the course of this past week we as a class conducted various projects. The main ideas for this week have been making predictions of how things work and also how mass is effected, through different experiments. These two main ideas connect by allowing us, the students to predict and learn how different elements and reactions affect the mass of objects.  I believe some of the important details to the idea of mass specifally, is the chemical aspect of these experiments.  When we were dealing with mass, there were definitely chemical reactions and elements that played into affect. We conducted 6 exeriments, testing how mass can be effected.
       For our first experiment, my group and I ran "Mass of dissolved sugar". In this lab we had to test the mass of water with a sugar cube inside vs. the mass of water with a dissolved sugar cube. It was hypothesized that the sugar cube would dissolve completely into the water and the mass would remain the mass. After conducting the lab, we learned that our prediction was incorrect. We observed the sugar cube slowly dissolving into the water and watched air bubbles rise to the top. Once the cube was dissolved, we noticed that is didn't necessarily dissolve completely but partially. There was sugar particles floating at the bottom of the vile. Overall, the resulted mass after this procedure has decreased by .4 grams.
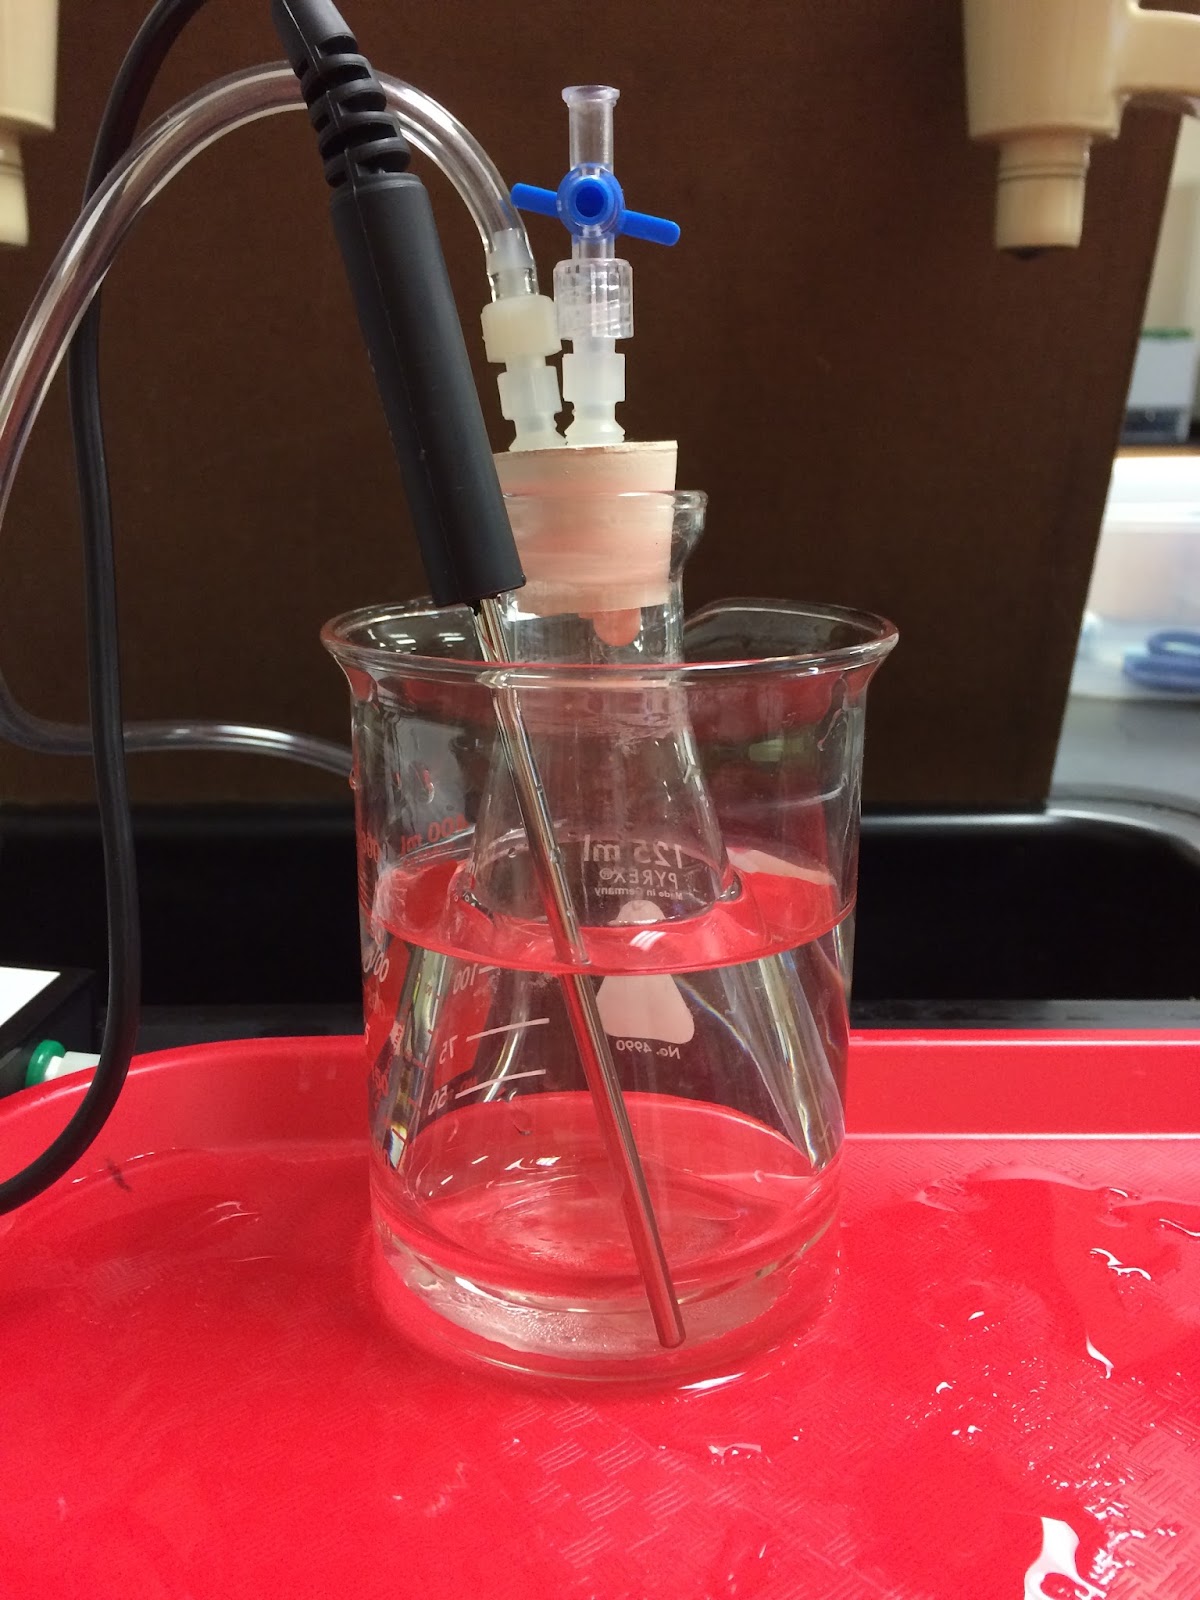
       The next experiment we did was the "Mass of percipitate"lab. For this lab we weighed the mass of CaCl2 (Calcium chloride) and Na2CO3 (Sodium Carbinate), both in separate viles, this total mass resulted in 53.4 grams. Before combining the two chemicals in one vile and weighing the mass, we hypothesized the the mass will neither increase nor decrease. After weighing, the resulted mass in 53.3 grams. I believe this .1 decrease was actually due to human error, while using the electric mass scale.
       Following the previous experiment, my group and I performed the "Mass of Steel Wool" investigation. We took steel wool and weighed the mass, before and after tearing it apart. We envisioned the piece of wool to have the same mass, being that we only changed the form of the wool. I think there was another human error that effected our results. Pieces of the material was continually falling off as we separated the wool. The pieces weren't landing in the tin pan under the wool as planned, but on the table and floor. Due to this happening, the resulted mass had decreased by .3 grams. This particular test follows into our next lab.
       Using the same steel wool from our previous lab, we performed our fourth lab which was "Mass of Burning Steel Wool".  With the same piece of wool we burned it and took observations. As we burned it we noticed particles were falling off of the material. Due to this observation, we predicted the matter would decrease in mass. Shockingly, our prediction was wrong. The piece of wool had increased .6 grams (from 20.7g to 21.3g). Throughout all of these tests, I found it interesting how these changes of mass came about. We continued onto 2 more experiments to examine how mass can be effected.
        For our fifth test of examining how mass can be effected, we conducted the "Mass of Ice and Water" investigation.  For the test, we weighed the mass of a piece of ice in a vile. After doing so, we melted the piece of ice by holding the vile with our hands, transferring our body heat. Our groups hypothesis for the resulted mass was that the mass would remain the same. We were only changing the matter from solid to liquid. As expected, the concluding mass came to be 10.7 grams, which was also the same mass of the ice.
       The last and final experiment we conducted was the "Mass of dissolved Alka-Seltzer" investigation. Like the sugar cube investigation, we tested the mass of the alka-seltzer in a vile with water before and after it was dissolved. It was predicted that the mass would stay the same. It was interesting to observe that there were bubbles rising to the top, just like with the sugar cubes. Like the sugar cube test, the Alia-seltzer had also decreased in mass, going from 34.98g to 34.84. I definitely think the air bubbles might've had something to do with the reasoning of why the mass had decreased.
       Through these various experiments, I feel that we were able to learn the main ideas by observing and testing how mass of an object/liquid can be affected and recording the data. We were also able to weigh the mass of there various test subjects by learning how to use an electric scale and non-electric scale. Overall, I don't feel as though I have any follow up questions about these main ideas of this week. I enjoyed experimenting and observing the different affects due to these ideas. As far as my participation goes for this weeks learning process, I feel that I was quite active. When doing journal boards with our table I almost felt like the leader in a sense, which doesn't happen often but I enjoyed. I made sure to ask questions in order to fully understand the material. From 1-10, my understanding of all of the ideas for this week would a 10. My ideas about the main topics of this week I don't feel have changed because I already knew information about mass from previous classes but it was definitely a refresher for me. I look forward to continuing on with new experiments and new ideas to investigate.